Quilt ADD in therapy

My photo
Colorado, United States
Other than my family, the passion of my life is quilting. An eclectic, I love a wide variety of styles and techniques encompassing both machine and hand work. I am a longarm quilter who can work for you. I enjoy any style, from pantographs to all-over to full custom, ranging from traditional to modern. I love bringing vintage tops to life and am willing to work with a challenging quilt top. Instagram: lyncc_quilts
Showing posts with label Sailing with the Flying Needles. Show all posts

Wednesday, November 7, 2012

WIP - yeah, yeah, yeah - Haven't I learned not to sew late at night? ;D

Crimeny Crickets.  

LOL. I thought I'd learned already that it is not a good thing at all for me to use my sewing machine after 9:15.  (We get up stinkin' early around here.)


First time I've done this binding snafu.  :)
Can you see on that black that I lined up the folded edge
instead of the raw edges?

So today's WIP is unpicking the seven feet of backward-attached binding. On a minkee quilt, no less! I even went around a corner before my brain finally noticed it and called it quits for the night.


Spending some quality time with my frogger friend.
"Rip-it, Rip-it"  


And a fun WIP for the new place - 


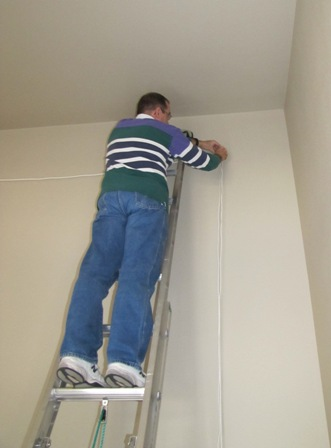
We have this super-high 15-foot wall in the house, so my Hubby-Man put up a pulley system for me to be able to display quilts up there and change them out without fighting the weight on a scary-tall ladder every time.


I was impressed that he thought to put potholders on the ladder's tops to keep them from marring the wall. Pretty good thinking for a man!  ;D 


We bought decorative curtain rods to put up on each side of the wall. This side is the piano parlor, the other is the family room.


On this side I'll hang the huger quilts. Patriots in Petticoats will go up as soon as I have its sleeve stitched on. For now, we lugged Sailing with the Flying Needles up there. It's a 90-incher. One day I'll have everything unpacked and all these piles here and there will be GONE.  :)  One day we'll also have decor up. Even a quilt by itself, though, makes it so much homier.


I ran out of discretionary money before I could buy some pretty cording that will fade into the wall, so a $1.50 pack of clotheslining will stand in for a couple of weeks. 


This armoire knob will also stand in until I can find the perfect tie-off hook to install on the wall. It'll be awesome when it's all finished.  :D

And the whole while Scott was working, this fella kept an eye on events through the window.


Thank you to Lee and this week's host for facilitating this motivation link-up!
WIP Wednesday at Freshly Pieced


Sunday, October 30, 2011

Bloggers' Quilt Festival: Fall 2011 entry "Sailing with the Flying Needles"

Amy'sCreativeSideWow!  Another wonderful Bloggers’ Quilt Festival! Thanks for organizing these, Amy. Go on over, folks, and check out all the super-fantastic quilts that folks have been making.


My favorite personal finish since the Spring Festival is my Sailing with the Flying Needles. It just turned out so wonderful.

81 x 81
Each month our local guild has a BOM drawing, where anyone who brings a block made in the designated pattern gets a chance to win the drawing for taking home all of those blocks. I got to take home all these wonderful sailboats last August.


I remember distinctly the moment I finally came up with how I wanted to arrange them: I was sitting in the car, waiting to pick up Dev outside the “band loop,” and I had to grab napkins out of the glove box to scribble down sketches before I forgot what I wanted to do.

Koko telling me this project is HIS
I already had the mariner’s compass. I had made it at the guild’s quilt retreat the prior March, and never got it finished up as the intended wall hanging. (I was really glad about that, as it went perfectly with the boat blocks!)

Its construction was an exercise in working with different ladies’ stitching levels, as some blocks had size issues due to uneven ¼” seams. I had to pick out and mostly redo a couple blocks because the seams were so large, the blocks were actually a good ½” too small. Eventually they all came together perfectly, and I was in love with the effect of the top.


Patty did a fantastic job quilting it for me. I had a panto of dolphins and sailboats that I wanted in the wide borders, and wanted roping on the turquoise outlines, but left the rest up to her. It was like Christmas the day I picked it up!  lol 


Got the binding on pretty quick and washed the quilt, but there was still a lot of work left, because I wanted embellishments on this one. I hand stitched little shells all around the compass. Each one is triple-stitched and knotted individually, just in case. 


The turquoise ropes are bordered by a shell trim and striped ribbon – which I washed and dried on the rack in my dryer 3 separate times because I knew the twill tape would shrink quite a bit and much differently than the ribbon. Then I carefully sewed the trims on.

And THEN I decided I had to hand-stitch each individual dangly into position so that when the quilt is hanging, gravity wouldn’t pull them out of position.


I got to watch quite a few movies over several evenings to get “Sailing” finised!  But, oh, how I love her!


Tuesday, August 2, 2011

FINISH! Sailing with the Flying Needles


81" x 81"


I am so excited to have this fun quilt finished! I can’t wait to take it to our next guild meeting for Show and Tell.


Its name reflects its origins. Our local quilt guild, The Flying Needles, has a monthly block drawing, and last August I got 12 boat blocks made by 11 other women and myself. How to assemble them? I didn’t want to just line them up in a grid, but I didn’t know what to do.


One late August day, while sitting in the long car line that snakes dangerously out onto 20 from the front of the high school, waiting to take my girl to an appointment, I pulled out some napkins and started sketching ideas.   I thought. . . “hmmmm....  I have that mariner’s star that hasn’t been worked up yet. . . “  and doodled a layout, wondering if the star would fit and how huge the quilt would be.


That mariner’s star had been made the first weekend in March at the guild’s retreat and was intended for a wall-hanging for a specific spot in the house. But coursework, parent responsibilities, and Heather’s time-sensitive graduation quilt kept infringing, and it never got assembled. So the next morning, after reading the day’s history allotment, I glanced at my napkin and shoved furniture around so I could play on my Design Floor.  Koko, who’d always been nonchalant about quilt projects, perked up almost immediately and had to sit with the blocks.  He was hilarious! I’d walk away to get a better view of the placement effect and he’d get all relaxed. I’d start walking back over to mess with the sailboats, and he’d stretch himself across as many as he could. This was very obviously HIS quilt!  lol


It took me the whole football season to get everything framed up and assembled properly (blocks, being made by 12 different folks, weren’t uniform in size, and the star had to be mounted on the white – ended up just hand stitching it down during the band-related trip out to Pace for All-State auditions).  I was instantly in love with that flimsy!! Oh, my! It turned out every bit as cool as I’d hoped.  And then I found the most awesome fabric for its backing. I loved it so much that I decided to make the back whole instead of piecing it with left-overs, so that the back would feel like the wide-open ocean.  Especially since I’d already decided on the quote I wanted to put on this one’s label: “Quilting friends are the wind in your sails that enable you to throw off the bowlines and sail away from the safe harbor, to catch the tradewinds in your sails and Explore, Dream, Discover.”  (an adaptation of Mark Twain)


For a couple more months I mulled over the quilting. I had time, as there were 2 or 3 other quilt tops that had priority, and my longarmer is popular locally – I get a custom job turn about every other month.  I knew how I wanted the sailboats quilted, since I had already designed their quilting for the August block on my 2010 Flying Needles BOM Quilt of Seasons. I surfed blogs and panto listings for ideas for the rest. The turquoise sashing just screamed for roping, so that part was easy. The wide navy marble was perfect for the very fun dophin and sailboat “Designs by Deb” panto. I couldn’t make up my mind how I wanted the white and the compass quilted, so when Patty let me know I could drop the quilt off, I gave her free rein for that part. I love what she came up with – using scrolling waves around the boats and pebbling with ditchwork to make the mariner’s star pop.


Thank you, Patty! It’s a marvelous quilting job!! She had to turn the quilt several times, as the panto is placed directionally for all 4 sides. She also worked hard to make nice corners for the roping and I’m really, really happy with it all. I know that part wasn’t easy – she ended up waiting a few weeks for her computer system to be installed and then had a better time with that part.


Picking this quilt up from her was like Christmas for me! Wow, it looked great, and it turned a depression episode around for me.  The binding was a bit of a challenge. It’s cut on the bias, but I wanted to switch between the turquoise and the navy at each juncture on the top. Wow! I actually redid 3 of the settings – one of those 3 times – to get the turquoise-to-blue line to match up exactly. I’m glad I went to the effort, because I really like the unbroken shape of the quilt’s outer corner shape.


Once I got it bound, it was time to add the shells and trim that I’d found along the way.  You know how it goes – you’ve popped into a store for some thread or whatever, and your eye sees something as you walk past a display, and your brain screams “Stop! wouldn’t that be awesome for that quilt?”  . . .


Looking at the trims, I realized the twill of the shell yardage would shrink way differently than the polyester ribbon, so I soaked everything carefully in hot water for several minutes before drying them on the shoe rack in my dryer. Did that twice just to be certain I wouldn’t have future problems when washing the quilt.


My boat


I attached the shell yardage and ribbon at the same time, working oh-so-slowly at my machine with the walking foot.  Had to shift the needle as far right as it would go to keep the foot’s edge from riding over the shells.  Patty had pointed out to me that if my trim had dangling shells, I’d need to turn the top one so they’d fall the right way. 


Once I got to putting it on, though, I couldn’t deal with the “backwardness” that would create in the ribbon placement, so the next step was go along, hand stitching each beaded shell strand down invisibly so that they would all fringe outward nice and neatly when hanging on the wall.  A bit OCD?  Maybe, but now that it’s finished, it was definitely worth that extra step.  (Oh, and every evening that I sat down in front of a show with Scott to work on this, Koko kept insistently trying to burrow into it, and then getting angry with me because I wouldn't let him - don't want cat hairs on this one!)  


Then I started painstakingly stitching each of the little loose shells around the mariner’s star. Each one had a double pass and was knotted before moving to the next, and when I was finally around the circle, I took a third pass just for added security, making knots at each compass point. Add the center steering piece, and the front was finished!


I had a lot of fun making the label. It just had to be a sailboat, of course.  Fiddled in Word with shaped and text manipulation to create the two sails. The little graphic on the big sail is our guild’s logo. I didn’t have fun making the hanging sleeve, but that’s crucial on this quilt, as it’ll go to a couple of shows and will otherwise hang in my house.


Now I just have to make a wall for it!


~.~.~
I'm hoping to find out who made each sailboat at the next meeting: 


Given our locale, this gal
must be a UF or Auburn fan!


Wednesday, July 27, 2011

My WIP 18 - Finishing many blues, gotta go to RED~!

362 inches of binding, 42 eyes, 1 label


3/5 of a circle, one label, one hanging sleeve


Time to pin-baste – trying out Tuscany wool for the first time


And I’m so very, very weary of Blue –
I am sick to death of
my beloved, beautiful, cooling, soothing, life-sustaining Blue.

So we are switching to Fiery, Passionate RED
and an oh-so-appropriate Kona Snow - 
It is finally time for Burning Up the Slopes!


~*~*~*~

A big "Thank you!" to Lee at Freshly Pieced for hosting WIP Wednesdays 
It really keeps me motivated to keep those UFOs going! (Go check out what everyone else is doing - there are some really neat projects out there!)


Also, Check out my BOMs AWAY Mondays regular link-up.  


This week's stats:

New Projects - 1!!  (I earn this when Sailing's last shell is put on and it's off the UFO list. Using this "allowance" for my cousin's wedding quilt, which has a fun story.)    
Completed Projects This Week -           
In Active Progress - 4    (Evening hand-work: Sailing with the Flying Needles, Around the World Heather, Devon's Owls; quilting: Marissa's Moment)
Children’s In Active Progress - 5    (Heather’s Dragons, Heather’s Geometric, Give Me Some Minky Love x 3)   
UFO Firing Range - 35.333          
Finishes for 2011 - 20  

Completed tops awaiting quilting (2 removed!):
One charity wheelchair quilt
Center of Marissa’s Moment of Freakishness
Marissa’s Moment Pillowcase panel
Dreamy Unicorns
Wagon Wheels West #2
Be Attitudes
We Love Kelly
Devon's Silk Spinners
Marissa's Minky Squares
Kelly's Thirties Hand Quilter
Kelly's Calico
Poor Forgotten Orphan from 15 Years Ago